Outdoor LED lighting projects demand special considerations for visual acuity, uniformity, and environmental friendliness, and one-for-one replacement is not a given. DAVID ETZLER provides tips on photometrics for outdoor lighting design that, properly applied, will ensure customer satisfaction with the end results.
Too often, people involved in lighting retrofit projects make assumptions. One of the biggest is that a one-for-one replacement of an outdoor pole light will create an acceptable result. Unfortunately, this is not always straightforward.
In a new construction project, a photometric plan is typically drawn up. However, since many lighting contractors do not have the capability to handle photometric designs in-house, if they expect to replace fixtures on a one-for-one basis, they are unlikely to spend the time on photometrics. On those rare occasions they do incorporate the plan into a project, they rely heavily on lighting manufacturers to execute it for them. Lighting specifiers and installers are often pitched by LED lighting manufacturers claiming to provide this service as a value-add, but it can create delays with the project; or, depending on the experience level of the designer, photometrics can be rushed, resulting in a less-than-optimal design.
It’s well established that replacing a 400W metal-halide (MH) area light fixture with a 100–150W LED fixture will result in crisper and brighter illumination, so many contractors skip the photometric process and start installing as quickly as they can in order to move on to the next project. This mistake not only can negatively impact your bottom line but it can do the same to a customer’s overall satisfaction.
Before diving in to how delivering photometric plans can both enhance your business and improve customer relationships, it is important to understand some of the basic elements of a photometric design.
Foundations of photometrics
At its basic level, a photometric design is a simulation of a lighting plan that can give the user a 2D and/or 3D view of the illumination provided by installing new LED lighting. It gives installers and specifiers the ability to determine what configuration of lighting fixtures will produce the best illumination for the outdoor application. The photometric design involves calculating both horizontal and vertical illuminance (brightness). Think of the horizontal measurement as the amount of light that lands on a horizontal surface, such as across the parking lot. The vertical measurement is the amount of light measured on a vertical surface such as a building wall. The measure of illuminance that we all know and use each day is called foot candles (mainly in the US) or lux (outside the US). One foot candle is defined as 1 lm/ft2.
Other important elements of a proper photometric design include BUG ratings, foot-candle ratios, optics, CCT, tilt, orientation, and roll.
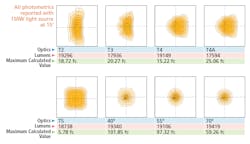
FIG. 1. The diagram above represents the various beam distributions that can be achieved by incorporating specialized optics into outdoor LED lighting designs during photometric planning. (Image credit: Deco Lighting.)
BUG stands for backlight, uplight, and glare. It is a rating system that is used to evaluate luminaire optical performance related to light trespass, sky glow, and high-angle brightness control (IES RP-20-14 Revised). This is especially important when you must take into account adjacent properties and light spilling over. Many municipal codes limit the amount of light that can spill over to the next property; if you avoid factoring this into your design, you may wind up re-installing the entire system, costing both you and your customer — perhaps municipal authorities — quite a bit of money.
One must be very careful with glare. If you are working on high mast poles, it is not much of an issue, but if the light source is located at a lower level, glare can be a major problem for pedestrians and drivers, especially if older customers frequent a parking lot, for instance. Remember, if your customer is unhappy because its customers are complaining, it will cost time and money to fix the problem. It may also cause you to lose future business from that customer.
Foot-candle ratios in outdoor parking lots usually refer to the max-to-min ratio. This indicates the proportion of the maximum foot-candle level to the minimum foot-candle level. 15:1 is the IES standard and if you go above that, the result is an unevenly-lit parking lot. In most cases, it is not feasible to install additional poles, leaving lighting designers stuck with the inherited layout. If the lot is a simple open rectangle, you probably will not encounter many problems using LED fixtures to achieve this 15:1 ratio. However, if the lot is oddly shaped and/or has obstructions, you will need to utilize one of the most important features of LED lighting — optics. Optics are lenses that direct LED light to achieve specific beam distribution patterns at particular angles. Fig. 1 shows examples of different LED optics patterns.
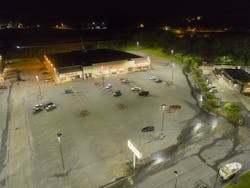
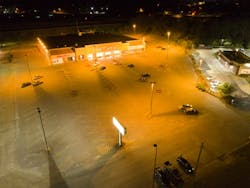
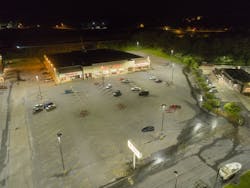
We recently completed a project for an REIT that owns a shopping center. The company’s tenant was insisting on higher foot-candle levels in order to renew the lease. While it would have been easy to just increase the foot-candle levels, we brought to the customer’s attention that it also had a lot of shadowing and replacing fixtures one for one would not resolve that issue. Additionally, we explained that the lighting at the entrance to the center was not designed correctly. After going through a few rounds of photometric plans, we were able to create a parking lot lighting plan that not only met the lease and REIT customers’ foot-candle requirements but virtually eliminated shadows and dark spots, improving the lot entrance dramatically (Fig. 2). Both the REIT client and its tenant were so happy with the outcome that we are now working on a portfolio of other shopping center projects for the same client.
Another tactic that lighting designers employ to aid in keeping the optimal max-to-min ratio for uniform illumination is tilt, orientation, and roll.
If an LED fixture is facing down at the ground, there is zero-degree tilt. We can then adjust it so the fixture is anywhere between 0–180°. But we need to be mindful with tilt. Many municipalities also regulate the amount of light traveling up. This is known as the dark sky movement. The premise is that activists and municipal authorities want to minimize light pollution and do not want light traveling up at all. Lighting professionals should first check to see if there are any local regulations that may apply to the project they are working on. If there are none, tilting an LED fixture may be the only way to create more uniformity on the lot without adding more poles.
FIG. 2. The before and after photos show the previous outdoor lighting (top) versus a properly placed LED luminaire layout (bottom) achieved using proper photometrics, which resulted in fewer shadowy areas and a more uniformly-lit parking lot.
Orientation refers to the horizontal movement of the LED fixture on the pole. If we use a compass as an example, there are 360°. We can move the fixture anywhere within the 360° to maximize the lighting pattern.
Roll is similar to tilt, but instead of the fixture moving straight up or down, the fixture may be turned side to side with one edge going up and the other edge going down. So in theory, the fixture can be positioned at 90°. Once again, this affects Dark Sky standards, so we need to be precise in planning and practice. Unless a proper photometric analysis is performed, you will be unable to optimize the layout and design for the project.
Let’s look at a case study as an example. For an outdoor LED lighting project in Tennessee, our team had a max-to-min ratio of 30:1 by just replacing fixtures one for one, using the same position as the current fixtures. When we adjusted the layout using tilt and orientation changes, we were able to bring the ratio down to 15:1, which is a dramatic improvement.
Consider color quality and efficacy
There are some other lighting characteristics and metrics that impact light quality and luminaire performance: CCT, CRI, and efficacy.
Correlated color temperature (CCT) has been a controversial topic in outdoor LED lighting. CCT describes the color appearance of white light defined in degrees Kelvin. A simple way to look at CCT is the difference between warm and cool. Warm generally means yellowish and cool tends to be bluish white light. The lower range (e.g., 2700K) is warm and the higher range (e.g., 5000K) is cool.
In outdoor lighting, the conventional wisdom has been to implement fixtures that output light at a cool, 5000K+ CCT. The perception of the user is that a 5000K light source will seem brighter and crisper versus a warmer CCT. Therefore, the outdoor environment will be more visible, as would any occupants. But as stated, recently there has been quite a bit of controversy over using higher CCT in outdoor LED lighting. There has been coverage in the popular press about the negative health effects that higher-CCT light may have on people and the environment, including a Fast Company story from August 2018.
In 2016, the American Medical Association (AMA) published an article about this very subject (see initial news coverage by LEDs Magazine). In response to the guidance by the AMA against the use of high-CCT LED lights, cities such as Phoenix, AZ; Lake Worth, FL; and 25 towns in Connecticut are now opting for street lamps with lower color temperatures, meaning less blue light emission. The AMA and the Illuminating Engineering Society (IES) met earlier this year at Strategies in Light to further debate and discuss these contentious outdoor lighting concerns, but thus far they have been unable to come to a mutual agreement on further guidance.
Many researchers are studying the effects of blue-rich light. Many in the lighting world are waiting for IES to take a firm stand on this. My suspicion is that the trend will be moving toward warmer CCT in the future, whether the research is conclusive or not.
To add more complexity to the color discussion, color rendering index (CRI) is a quantitative measure of the ability of a light source to reveal the colors of various objects faithfully in comparison with an ideal or natural light source. Light sources with a high CRI are desirable in color-critical applications, such as neonatal care, art restoration, and high-end retail environments. For outdoor lighting, CRI does not play much of a critical role. Most LED outdoor luminaires have a CRI of 70 or better, which is fine for illuminating a general-use parking lot, for instance. The exception to this is a lot that displays items where color is very important, such as an automotive dealership. In this scenario, there may be a need to show off vibrant colors and the customer and designer may opt for a higher CRI.
The disadvantage of a higher-CRI fixture is that the efficacy (lumens per watt) decreases. You can be losing 20% or more of the light level to achieve a higher CRI and the energy consumption is higher. Is this tradeoff worthwhile? That depends on the project’s objectives and customer preference. We would want to see a photometric study with both high CRI and normal CRI in this situation so that we can evaluate the differences and present the options to the customer.
When a luminaire has higher efficacy, it consumes less energy and saves the customer more money on energy bills while achieving adequate light levels. When comparing light fixtures side by side, as long as you can achieve your goals for uniformity and light levels, the customer will be better off using an LED fixture with higher efficacy. In the short term, the fixture may be more expensive; therefore, it may be harder to sell the project.
Upfront cost is the dilemma many of us face when selling LED technology. Showing the customer the results of a before and after comparison on projects where LED retrofits were properly planned out with photometrics, designed for the intended use, and properly installed can be very persuasive. Providing information on payback from energy savings may also help to move the needle. Attention to these details will help to build better business relationships and ensure successful outdoor LED lighting projects.
DAVID ETZLER, LEED GA, president of SIB Lighting, manages the firm’s strategy and growth, including strategic partnerships with property management firms and building owners all across the country. He came to SIB Lighting through the acquisition of his company, HOA Energy Advisors, in May of 2015. HOA Energy helps commercial properties save money on their energy bills through lighting and lighting control systems. Prior to HOA Energy, Etzler founded and owned BusinessEvents, LLC, an event production and management company focused on the energy market. BusinessEvents produced energy conferences, tradeshows and special events all over the world.
